Any design can be designated as a standard parametric library item and any style made into specification sheet.
Spec sheets can include graphics, logos and any tracked information from your Document Data Manager. Rules™ ships with a couple of example specification sheets to act as a starting point for making your own. If you’re on a service contract, we’d be happy to help you create your own specification sheet. Email your current factory spec to AlphaCorr™ with what you want on the sheet and we will make one for you. If you decide to make more or just want to make your own, follow the instructions below.

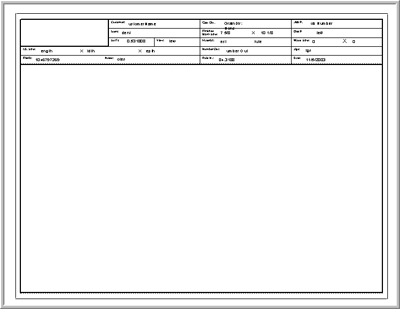
Open the file Spec.vc6 from the SpecSheets folder inside the Rules folder. The file should look like the one above. Rules spec sheets will usually depict one “die’s worth” of the design. In other words, if you have a design that has a top and bottom container along with two inserts, the pieces that together make up a cutting die should be specified together as if you are ordering the die. Making a specification sheet is easy once you know a couple of things about how Rules works under the Ashlar-Vellum Graphite engine.
The easiest way to create a new spec sheet is to start with one of the supplied specs as shown above. There are two main areas of a spec sheet: the form data and the detailed view window. The form area is the space outside the detailed view window. This “form” space usually contains line geometry that forms the title block areas and text items linked to the Document Data Manger. It may also contain logos, notes, disclaimers, copyrights or other information you need on your factory specs all the time. The detailed view window will contain the design itself when you use one of the reporting functions - Spec Chooser or Sheet Into View.
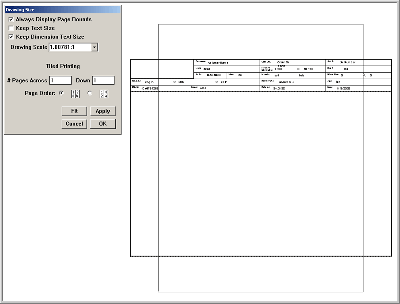
The first step in making a spec sheet that always works is to go the menu and choose Layout → Drawing Size...

The default printer page setup is shown on the screen in a gray outline. The important thing here is to setup your default desktop printer correctly to match how you want your spec sheet to work. Set up the desktop printer you will use for these spec sheets to have the orientation you intend to use. In the example above, the orientation is set to portrait, but our spec sheet requires landscape. In this case, go into the page setup or print setup for the printer and change the orientation to landscape. Make sure to open a clean Untitled 1 drawing, and save the preferences by choosing Layout → Preferences → Save Preferences. When you return to the spec in progress, choose Layout → Drawing Size again to confirm that the page setup has been changed to landscape. Your spec sheet block area must fall entirely inside the gray outline representing the printer’s output area for the one step spec printing to produce the intended results. Scale, change or redraw any block geometry you want for your spec sheet inside the gray boundary. Click on the detailed view window to activate it and resize it to fit into your new spec sheet. The design geometry will be displayed in this detailed view window when the spec sheet template is used. The design will be automatically scaled to fit inside this window when the spec is used.
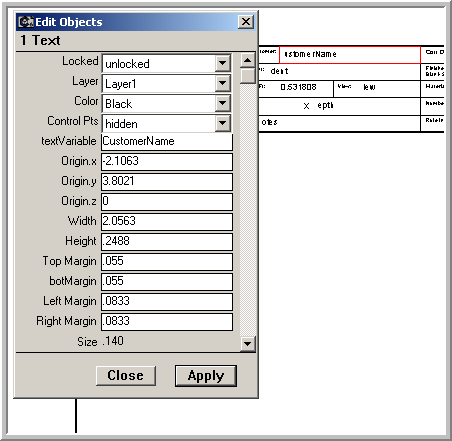
You can link all the text boxes in a spec sheet to their respective Document Data Manger fields all at once or one at a time. To link a text box to a data field, create a text box or use one of the existing text boxes on the spec sheet. Type the name of the data field you want to link to in the text box exactly as it appears in the Doc Data Mgr. Select the text box you just made and choose Text → Make Auto Fill Box from the main menu. Select the text box again, and choose Edit → Edit Objects to verify that the correct link was made.

The fifth line in the Edit Objects dialog is called textVariable. The value for the textVariable should match your Doc Data Mgr Field name exactly for the field to be linked. Continue creating and linking text boxes until you have all the fields you want from the Doc Data Mgr on your spec. Create, place, and arrange text boxes until you are satisfied with the layout and content of your spec sheet. As long as the proper linking field names are typed into the text boxes you can link them all at once by selecting them all and using the Text → Make Auto Fills Box command. Rules will scan each text box and attach the text inside it to the textVariable. So if the text in a text box doesn’t match any field names from the Doc Data Mgr, it will be assigned the variable, but since there is no matching field, it will not be filled in with any information. Block headers are ignored this way as long as the description of the block doesn’t match a field name. If you were to have a block header that matched, such as “Length,” make sure it is not selected when you issue the Make Auto Fills Box command or it will get filled in with the value of the design’s Length when the spec is used. You can add as many unlinked fields as you want; they just won’t automatically fill in with information. You can insert the @ symbol in front of the text in an unlinked text box and then when you use the spec sheet you can choose Text → Forms Text and you will be prompted to enter values for any fields you set up that way. The linked fields will be filled in with the Doc Data Mgr Field data and then you can fill in uncollected data via the Forms Text command. You can also just simply type data into the text fields upon use of any spec sheet. A combination of these options provides an excellent method of ensuring that consistent field data is recorded each time a spec sheet is used.