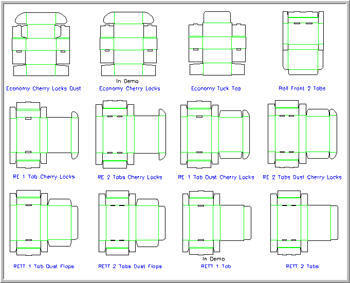
The easiest way to create package solutions is to start with an industry standard design. Rules™ makes it easier than any other program to find the right design and make it the right size for your application. Select Cartons → Roll End → Show All Styles... from the Cartons menu, your screen should look like this:

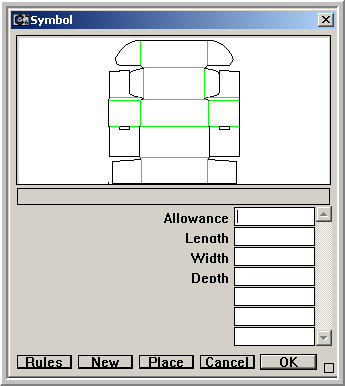
If you don’t want any of the displayed styles, choose another “Style” sheet from the list in the Cartons menu or choose “Cancel This Style Sheet” from the Cartons menu. You can cancel the style sheet at any time by right clicking on a design in the style sheet and choosing “Cancel This Style Sheet”. You can browse through the style sheets any time in the design process and add more parts or designs to a file. Right click on the graphic for the style you like, and select “Make This Standard” from the popup menu that appears. The Symbol dialog box will appear as shown below. If you had specified sizes in the Document Data Manager before selecting the design style from the library, the values for length, width and depth would probably be filled in already. The fields that bear the same name are associative throughout the design. A library item is referred to by Graphite™ as a symbol.

Type sizes in fractions or decimals for the variables found in the design you have chosen and then click “OK”. Although you can, you don’t need to enter the units symbol unless you want units other than are the current units set up in the system. For parameters in this design I could use: Allowance of .125, a Length of 12”, a Width of 4”, and a Depth of 101.6mm. You can mix units, use mathematical equations and use fractions or decimals in almost all of Rules’ entry boxes. If you don’t enter a required parameter, Rules will alert you to go back and fill it in. You need to supply reasonable sizing parameters for the design you are trying to use. For example, if using an Allowance of 1/8”, a Length of 12”, a Width of 12”, and a Depth of 1”, Rules will do it’s best to resolve the design to those parameters. It is up to you as the designer to know that those dimensions are absurd for this style of container. Some extremely bad combinations can produce conditions where it is physically impossible to draw the design with the given parameters. In this case you will see an error dialog saying that the symbol could not be resolved.
Sometimes you might need to do a “Zoom All” (Ctl+F) from the Arrange menu to see the entire drawing. It depends on how big you make the design and at what scale you are viewing the drawing when you call for the new library item. You can edit any template file by right clicking on its design in the style sheet and choosing “Edit This Standard” or “Spin Off” another version in addition to the one in the library if you prefer.
Once you have your library or template design resolved into your current drawing, right click on it and select “Resize” from the popup menu to change the design’s size. You can add features or otherwise add geometry to the design by using the main tools. If you want to alter the standard library design’s individual pieces, choose “Explode” from the popup menu that appears when you right click on a standard design. Once the design is exploded, make changes to the individual pieces of geometry, however, once the design is explode, it looses its ability to resize. As long as you do not explode the library item, you can resize your design by entering new values in the Document Data Manager dialog, by choosing Cartons → Data Manager, typing in new values and clicking “OK”, or by selecting the item and choosing Edit → Resolve.
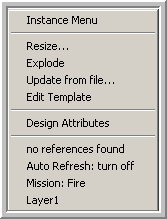
If you use want to use more than one item from the library in a single design, there are a few important relationships that exist and you should consider the effects of various methods before doing so. Rules intends for you to use items from the library that share the same variables. For example, a telescoping box top and bottom are two separate pieces that share the same variables. Lets say you have designed your own library templates for telescoping boxes and placed them in two separate template files. See, “Working With Style Sheets” for details on how to add your own designs to style sheets. You can enter the library items by picking them from the style sheet normally. Since they share the same variables, the two pieces resize correctly together when you change a value in the Data Manager or otherwise. If you were to use an RSC as the bottom, and then enter four-sided tray as the top, the RSC will resize to the sizes you type in for the tray. This is not usually what we want to have happen. We really want the RSC to use one set of LWD values and the tray top to use a different set of LWD values. You can do this inside of the same drawing, but you can only maintain one set of variables as the master variables at one time. To properly create the RSC bottom and the tray top in the same file, make the RSC from the library first. Make the RSC as described above. Right click on the RSC once you have it the size you want and choose “Auto Refresh: turn off” from the menu that pops up:

Now, call the style sheet containing the tray top and enter it into the design as described above. When you resize the top or go into the Data Manager and enter different values for the top, the RSC will no longer resize. The variables affect only geometry with the “Auto Refresh” value “on”. Rules uses sub assemblies, which are external file references, to track parts of a design that are all in one project but would likely be separate dies or have the same variables but different values for those variables.